• Skip to primary navigation
  • Skip to main content
  • Skip to primary sidebar
  • Skip to footer
Grower Today
  • Home
  • Soils & Plant Nutrients
    • Composting
    • Soil Amendments & Fertilizers
  • Organic Pest Control
  • Natural Weed Control
  • Organic Food
  • Hydroponics

Aglaonema Care Guide: How to Grow Chinese Evergreen

May 16, 2023 by Dr. Nyiko C. Mabasa

Aglaonema, the Chinese evergreen is a low-maintenance and versatile houseplant that comes in wide varieties. This plant is great for adding a bit of color to any working or residential area if well taken care of. In this article, we will give you the best Aglaonema care guide that will help you to get the best out of these stunning plants.

Some of the qualities that make Aglaonema such a popular and ideal houseplant include its unique, lush, and beautiful foliage. With these qualities, there is no reason why you would not consider having this plant in your living or working space. Another great advantage of this plant is that it adapts really well to different environmental conditions. If you want to know what these conditions are and how best to get your Chinese evergreen to thrive in them, keep reading.

Aglaonema

Agloanema, commonly known as the Chinese evergreen is a plant that is Native to the forest areas of Asia. Because this plant grows under canopies of taller plants where it is shielded from direct sunlight, it has adapted to low light conditions. This is one of the qualities that makes it such a good indoor plant.

When planted indoors, they grow to sizes of 12-24 inches in height. They can be almost as wide as they are long and have lance-shaped leaves. Because it starts small and grows quite slowly, you can keep them on your desks for anywhere between 12-18 months before it gets too big.

Few plants are as easy or easier to care for as the Chinese evergreen. Although it is adapted to low light conditions due to its natural habitat, it can also tolerate fluorescent lighting indoors if provided with it.

There are hundreds of different varieties of Aglaonemas and they have different environmental requirements to thrive. It is therefore essential to know the particular variety of the one you have so you can give it just the right growing environments it requires.

Aglaonemas Plant Care

As with all other plants, there are ideal environmental conditions you need to maintain to keep them happy. We will discuss these below.

Temperature

Aglaonema prefers temperatures between 65-75°F degrees Fahrenheit to thrive. They can tolerate temperatures of about 10 degrees Fahrenheit outside this range without suffering any serious damage. Feed your Aglaonema monthly during the spring and summer, when the temperatures are within this range.

Light exposure

Due to the natural habitat of this plant, it prefers bright but indirect sunlight. Never expose it to full sun as it may cause leaf burn and may ultimately kill the plant.

If you keep the plant indoors, artificial or fluorescent light will be enough to keep it alive and growing.

The light tolerance levels vary between Aglaonema varieties. The darker green varieties of this plant can tolerate low light intensities. The ones with lighter-colored leaves, however, prefer bright and indirect light. An example of these light-leafed varieties is the Aglaonema Osaka.

In general, the more colorful varieties of the plant, such as those with pinks, reds, and peaches need more light to maintain their vibrancy.

Newer cultivars of Aglaonema have bright colors such as red and pink. These normally do not do well in low-light conditions. They can, however, survive in such conditions. But if you notice that they are losing their color, simply move them to an area with more light and you should notice their color should start to come back.

Humidity

Chinese evergreen plants prefer more humidity than most homes and indoor spaces can provide. This means that you should provide them with supplemental humidity. You can boost humidity levels in their environment by putting the plant in a pebble tray, using a humidifier, or putting the plants in a group with other plants.

You can also try misting your plants once to a few times each week. This will only make a minor difference in terms of improving humidity levels. It does however offer the potential benefit of getting rid of pests that may be trying to infest your plant.

Soil moisture and watering

Chinese evergreen plants like to stay moist but not soaking wet. When you water the plant, make sure that the water drains completely each time so that it does not get waterlogged. Only water if the first two inches of the soil are dry.

Overwatering can cause the plant leaves to turn yellow, and the roots of the plant to rot. Another sign of overwatering may be the yellowing of the tanks, as well as mushy stalks and leaves.

Repotting

To repot your plants, use good soil with peat and pine bark blended. Never use peat moss directly or by itself as it colds too much water and will not allow the roots of your plant to dry out as needed.

Repot Chinese evergreens once every 12-18 months. Use the same vessel with new soil, and trim away some of the roots and leaves. Repotting should be done in the spring or summer months only, this is when they are actively growing and have the best chance of surviving the repot.

If you are repotting a larger plant, do it every 18-24 months. Use a new pot that is about 2-4″ larger than the current one. This will give room for the plant to grow.

Fertilizing

Any good, balanced houseplant fertilizer will work for Aglaonema. Feed your Aglaonema monthly during the spring and summer while they are actively growing. Reduce the amount of fertilizer you give them in the fall and completely stop feeding in the winter months as the plants enter dormancy.

Providing fertilizer to the plants in the winter when they do not need the nutrients for growth can lead to fertilizer buildup in the soil, which will burn the roots over time.

Rotate your plant

Rotate your Chinese evergreens from time to time so that they get all sides exposed to sunlight so the plant can grow evenly.

Inspect your plants for pests

When taking care of your plants, and dusting the leaves, make sure that you inspect especially the underside of the plant to check for any pests that need to be removed before they cause any damage to the plant.

aglaonema plant care guide

How to Grow Aglaonema

Aglaonema are very low-maintenance plants that are great for even the novice gardener or plant parent. Here are some points on how to grow Chinese evergreens.

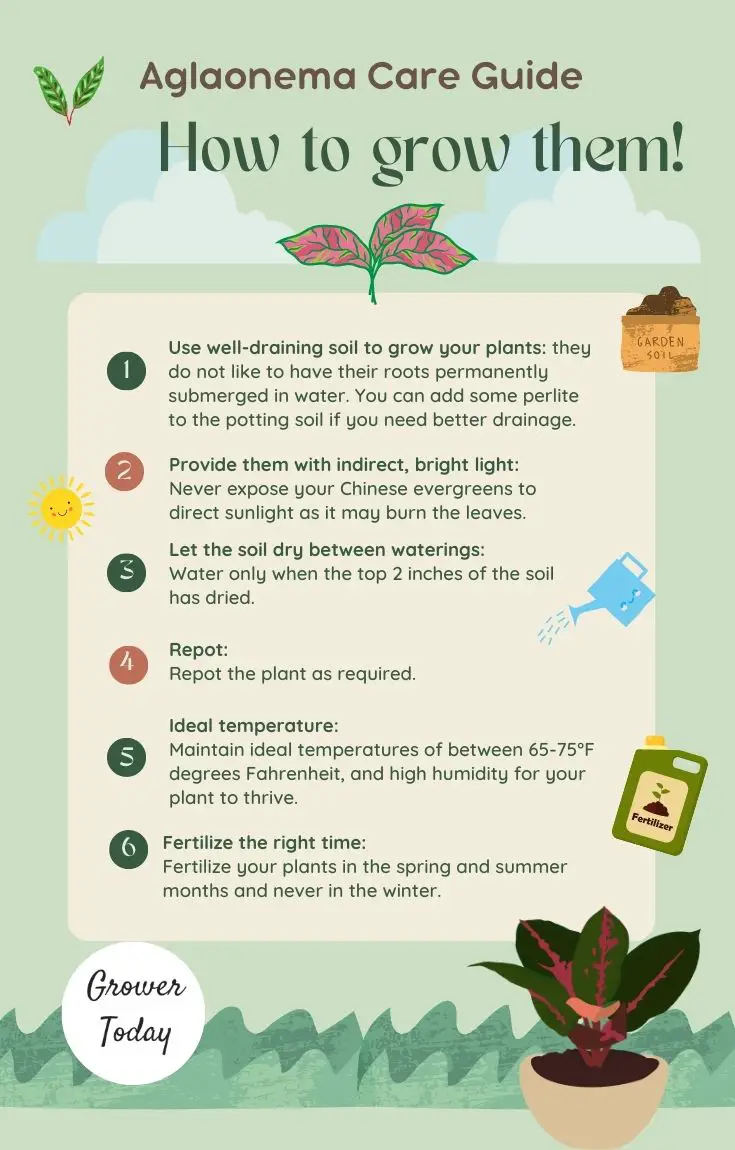
1: Use well-draining soil to grow your plants

They do really well in well-draining soils as they do not like to have their roots permanently submerged in water. You can add some perlite to the potting soil if you need better drainage.

2: Provide them with indirect, bright light

Never expose your Chinese evergreens to direct sunlight as it may burn the leaves.

3: Let the soil dry between waterings

This will give the plant roots room to breathe so the plant can grow efficiently. Water only when the top 2 inches of the soil has dried.

4: Repot

Repot the plant as required.

5: Ideal temperature

Maintain ideal temperatures of between 65-75°F degrees Fahrenheit, and high humidity for your plant to thrive.

6: Fertilize the right time

Fertilize your plants in the spring and summer months and never in the winter.

Aglaonema care indoors is the same as outdoors. The environmental conditions that you should provide the plants are the same regardless of where they are planted. If they are indoors, however, it is easier to get the environmental conditions right as you can manipulate them.

Types of Aglaonema

There are many different varieties of Aglaonema that you can cultivate. In the past, there were only green and cream varieties available. However, there are many different Aglaonema shades that you can find. There are more colorful Aglaonema in colors such as pink, red, and peach. Here are five of the most common varieties;

  • Aglaonema Commutatum (Emerald Beauty) – also known as the Maria. It is one of the older varieties and has dark green leaves with light green stripes.
  • Aglaonema (Sparkling Sarah) – has pink stems and midribs. It also has pink mottling on the green leaves of the plant.
  • Ruby Red – The leaves of this Chinese evergreen variety are a beautiful bright red and have stems with a shade of pink.
  • Aglaonema Commutatum (Silver Bay) – The leaves of this variety have a light silver leaf variegation.
  • Siam Aurora Red – has ed stems and midribs. The leaves also have a red frame.

Problems Associated With Chinese Evergreen Plants

While these plants are some of the easiest to take care of, they can have their fair share of issues that you should be aware of in case you ever have to deal with them.

The number one issue is susceptibility to pest infestations. Chinese evergreen plans are susceptible to spider mites, mealybugs, and scale. They get infested most of the time because they are not healthy and stressed. Opportunistic bigs use this window to destroy them.

Keeping your plants in their best health will help you to avoid this. You can also use this leaf wellness spray to prevent infestations.

Yellowing of leaves is another common occurrence. This usually signals that your plants are stressed. Investigate which of their environmental conditions are not ideal and remedy it as soon as possible. Your plants should return to good health in no time.

Dropping leaves or leaf curls are other indicators of stress on plants. This can be a consequence of leaf burn from direct sunlight. If you notice this, move your plants away from sunlight.

Unfortunately, Chinese evergreen plants are toxic to dogs, cats, and horses. If you have any pets in your house, you will need to keep them out of their reach.

Conclusion – Aglaonema Care Guide: How to Grow Chinese Evergreen

Aglaonema are such low-maintenance plants that anyone can keep them in their home or office. So whether you are a novice or an experienced hardener, these plants can be a great addition to your space.

We hope that you found this Aglaonema care guide useful and that you will be well on your way to growing and maintaining these beautiful plants.

The most important thing to do is provide them with the kind of environmental conditions that mimic their natural habitat.  These are; high humidity, moderate temperatures, and indirect bright light.

Happy growing!

Filed Under: Interesting Facts, Plants, Soils & Plant Nutrients, Tips & Guides Tagged With: aglaonema care, aglaonema care indoors, aglaonema shades, aglaonemas plant care, colorful aglaonema, how to grow aglaonema, types of aglaonema

Aphids on Tomato Plants: How to Naturally Get Rid of Them

May 16, 2023 by Dr. Nyiko C. Mabasa

If you have ever grown tomatoes in your garden, you will know that tomatoes are very susceptible to aphid infestations. These little critters can cause incredible damage to your crop if you do not take care of them early. In this article, we will be talking about aphids on tomato plants: How to naturally get rid of them.

If you have kept tomatoes for long enough, there’s a high likelihood of finding aphids on the plants. Aphids are common, even in an organic garden. They can quickly take over the garden and can be frustrating to deal with. If you are faced with this problem, do not despair. We have a lot of tips, tricks, and control methods that we will give to you.

What Are Aphids?

Aphids are small pests that belong to the family Aphididae. Worldwide, there are more than 4000 species of aphids. They occur mostly in moderate and warm climates.

Aphids have tiny bodies that are soft and pear-shaped. A lot of them are similar in size, which is about an eighth of an inch; aphids vary in size. They come in different colors. Depending on the type, they can be pale green, or black aphids on tomato plants, red, yellow, or white aphids on tomato plants.

They usually occur in clusters at the base of leaves and stems of plants. They then bite into these plant parts and suck out the liquids inside.

Tomato plants usually get infested with potato aphids. This type is usually red aphids on tomato plants. Tomatoes can also get infested with peach aphids, which appear as green bugs on tomato plants.

Early in the spring, aphids migrate to tomato fields from hosts in the wild, and then they establish their colonies on the plants. Aphids have a very high rate of reproduction. A single aphid can easily lay up to a maximum of 100 eggs in its lifetime. Because of this, colonies of aphids increase very quickly in population.

Aphids in small populations are not a very big problem, however, if they are left untreated, they can completely destroy your crop.

Symptoms of Aphid Infested Tomatoes

Once aphids are present in high numbers in an area, they develop wings that help them spread to form colonies in other areas with susceptible plants, such as a tomato garden. They may be hard to spot if you are not paying attention to them. There are some symptoms that you can look out for.

Because aphides like to colonize the bottom parts of leaves, they can easily suck up the sap from the leaves unnoticed. This will cause the leaves to wilt and turn yellow. New growth on the plant may have become stunted growth. The result of this is that the tomato yields will be reduced and the fruits may become deformed.

Stunted leaves with a deformed appearance or curled edges are a clear sign of aphid damage on tomato leaves. When these pests suck the sap and nutrients from the leaves and stems of the plant, the leaves will not grow properly.

Aphids produce honeydew, a clear and sticky substance that coats the areas that the aphids have been on. Because honeydew is sugary, it attracts ants. If you notice populations of ants on your tomatoes, it could be a sign that you have an aphid infestation.

If the leaves and/or stems of your tomato plants appear black, it could be another sign that aphids have been infested. The honeydew produced by aphids can be a haven for sooty mold which paints the plant black.

Other symptoms of aphid-infested tomatoes include the wilting of plant stems from the loss of sap by the aphids feeding on them.

Although aphids are noticeable to the naked eye, it’s a fact that they can still be very small and difficult to see. The signs and symptoms listed above can help you identify when your tomato plants have been infested so that you can take care of the issue before it becomes a big problem.

Do Aphids Like Tomato Plants?

Tomatoes are great at attracting aphids into gardens. They especially enjoy sucking the sap from young plant leaves and fruits.

While aphids are generally attracted to tomatoes, they are not going to cause any damage if they are in small populations. But as soon as the infestation increases and takes over, the destruction of the plant tissues will begin and can eventually kill the plants.

In cases where aphids do not kill the plant, they can stunt the growth of plants. This would be a better scenario for the outcome of an infestation. Usually, an aphid infestation kills the plants by overfeeding the sap and transmitting diseases. Aphids feed on the plant sap by sucking it out with their piercing and sucking mouthparts.

Tomatoes are quite resilient to large numbers of aphids without suffering much damage. In severe cases, however, symptoms of damage such as leaf curling and stunted plant growth may be observed. The reduced leaf area will expose the fruit to sun scald, which will ultimately reduce yield.

Aphids are vectors of certain plant viruses. This means that even if they are not in high enough populations to damage the plants by overfeeding on the sap, they can transport certain viruses that may cause damage or even kill the plants. It is therefore best to take care of an aphid problem because it causes irreversible damage.

How to Get Rid of Aphids on Tomato Plants

Fortunately, there are numerous options you can choose from to get rid of aphids on your tomato plants. There are biological, cultural, physical, and chemical methods you can use. But if you want to be safe and not introduce any potential threats to your crop, it is best to stick to natural options and biological methods such as;

Manual removal

If you spot aphids on your tomato plants while they are still only a few, you can simply pick them and put them in a bucket filled with soapy water to kill them. Check the undersides of tomato leaves to make sure that you get all the pests off.

After the first time picking off the aphids, repeat the inspection daily for a few days to check whether or not you may need to take further steps to get rid of them.

Water spray

A water spray with a garden hose is another great way of getting rid of aphids. Use a sharp but gentle blast of water to knock them off the tomato leaves and stems. This will surely decrease the aphid populations. Check every few days again to determine whether you need to repeat the process.

Be careful when using a water hose as it may also knock off beneficial insects from your plants, and may break the branches of the plant, especially the young ones.

Bug repellent

Instead of buying store-brand bug repellents, you can use garlic, rosemary, peppermint, water, and dish soap to make your own at home. These are all-natural ingredients and will safely get rid of aphids from your tomatoes, as they are gentle.

This mix does not kill the bugs, but what smells will mask the scent of the tomato as the host plant so they will not be able to locate it.

get rid of aphids on tomato plants

Water and dish soap

A mixture of water and dish soap will also work fine to repel aphids from your tomato plants. Mix a few teaspoons of liquid dish soap with one quart of water. Simply spray this mixture on the plant leaves and it will kill the bugs by suffocating them.

Introduce predatory insects

The introduction of predatory insects into a garden that aphids have infested is one of the most efficient ways to get rid of or control them. Many people introduce insects such as ladybugs and lacewings into their gardens.

Birds such as hummingbirds are another great predator of aphids as they love to snack on them. Invite birds into your garden by strategically placing bird feeders in various places and they will help you out a lot.

Diatomaceous earth

Diatomaceous earth (DE) is a powder made from fossilized algae that are rich in silica. It can be deadly to aphids. The edges of the DE grains cut into the soft bodies of aphids, causing them to dry up and die.

Sprinkle some DE onto both the soil and your tomato plants to kill aphids. Be careful to select food-grade DE when your purchase it from the store. It is safe for humans and can be used on plants, unlike filter-grade DE which is not. Only apply DE early in the morning or later in the evening when the dew has dried, as it does not work when wet.

Neem oil

Neem oil is a natural bug repellent that is useful against many different types of bugs and insects. It works similarly to insecticidal soap, that is by suffocating the aphids when sprayed on them. It also works systemically by interfering with the hormone receptors in the insects, hence it is referred to as a broad-spectrum insecticide.

Alcohol sprays

Rubbing alcohol is an easily available, affordable, and simple solution to aphid infestations. Mix equal parts water and alcohol in a sprayer bottle, add a teaspoon of soap to make the mixture more effective, and spray it on your infested plants.

Humus

Adding humus as a soil amendment around your tomato plants will control infestations, as aphids do not like it.

Pruning

If you notice that only certain leaves of the tomat0 plant are heavily infested, and perhaps have started showing signs of damage, pruning them off may be the best way to get rid of the clusters of aphids and will stop them from breeding.

In summary, natural options such as rubbing alcohol and neem oil are great products to use for treating aphid infestations on tomato plants. If these are unavailable to you, mix a few teaspoons of liquid dish soap with one quart of water. Always make sure to check the undersides of tomato leaves to get rid of aphids efficiently.

How to Prevent Aphids on Tomatoes

As you probably know, prevention is better than cure. Instead of waiting until you get an infestation to deal with, there are certain proactive steps you can take to prevent or minimize the risk of getting an aphid infestation on your tomatoes;

Healthy soil and healthy plants

Insects and other pests prey on weak plants that are growing on low-quality or degraded soil. The best way to avoid this is to build up healthy soil in your garden by mulching or adding organic matter so that there is a constant availability of nutrients to your plants.

Companion planting

Planting fragrant flowers and herbs alongside tomatoes can help control pests. Plants such as marigolds and basil are great insect and pest repellents that can ask the scent of tomatoes, hiding and protecting them from aphids.

Sticky traps

Aphids are attracted to bright colors such as yellow. You can purchase yellow sticky boards and place them around your tomatoes. The aphids will get attracted to them and will get trapped before they get to the plants.

Attract more aphid predators

Aphids have natural predators such as lady beetles, syrphid flies, and lacewings. If you can find a way to grow these insects in your garden, they will do a great job of helping you out with pest control.

Setting up birdhouses and feeders in the garden before there is any noticeable infestation may be a great idea t keep it at bay.

Row covers

Place row covers over your tomato plants immediately after planting them. This will help to protect them from extreme weather conditions and changes that could potentially hurt the growth and health of their plants, making them susceptible to opportunistic pests.

Conclusion – Aphids on Tomato Plants

Aphids can cause great destruction to tomato plants if left unchecked. It is therefore best to tackle them as soon as you notice them in your garden before they cause devastating that they are very well capable of in large populations. Another great way to deal with a possible infestation is by being proactive and placing systems and measures in place that will prevent infestations from taking place.

Use the tips and tricks provided in this article to get rid of aphid infestation problems in your tomato plants so you can get a good harvest.

Happy growing!

Filed Under: Organic Food, Organic Pest Control, Plants, Tips & Guides Tagged With: aphid damage on tomato leaves, aphids on tomato plants, black aphids on tomato plants, do aphids like tomato plants, green bugs on tomato plants, red aphids on tomato plants, white aphids on tomato plants

Tomatoes Not Turning Red? 14 Tips for Ripening Tomatoes

May 16, 2023 by Dr. Nyiko C. Mabasa

Are your tomatoes not turning red despite being big enough to be ripe and have been in the ground for long enough? This is a common frustration that many tomato gardeners face. Do not despair, there are ways to diagnose this problem and solutions to it. In this article, we will give you 14 tips for ripening tomatoes.

Tomatoes are some of the most common and versatile vegetables that are used in every household. Fresh garden tomatoes are some of the best and freshest you can ever taste. So it can be discouraging when your tomatoes don’t ripen when you expect them to. Keep reading this article to learn all about tomatoes not turning red.

Tomatoes

Tomatoes are described as edible berries of the plant Solanum lycopersicum, which is commonly referred to as the tomato. The tomato plant originates from South America, Mexico, and Central America.

Many different types and varieties of tomatoes are used for different purposes, such as cooking, salads, pickling, etc.

Indeterminate tomato plant varieties are perennials in their natural habitat, however, they can be cultivated as annuals. Depending on the cultivar, plants can grow up to 1/2-4 inches in width.

Tomatoes can come in different colors too, with most of them turning red when ripe. As a result, it can be quite frustrating when tomatoes don’t turn red when you expect them to.

Why Are My Tomatoes Not Turning Red?

There are different reasons why tomatoes are not turning red.

The first and most obvious reason is that they may not be ripe yet. Tomatoes have a long growing season. Depending on the variety, they may take anywhere between 60 to more than 100 days from the day they are transplanted to when they are ready for harvest. If you are not sure what the exact timeframe for the ripening of your plants is, check the packaging, as this information is usually provided.

Another reason is that some tomatoes are just not red when ripe, so they can not be expected to turn red even when they are ready for harvesting. Some tomatoes have unique colors. Examples of these include;

  • Sungold cherry, garden peach, and Persimmon, which are yellow when ripe
  • Black krim, which is a beautiful black color
  • Green zebra, which is a modern heirloom tomato that is known for its lime green color.

While these tomatoes have unusual colors, they are great to grow if you want to try something different.

As tomatoes mature in the summer, they can become big and overgrown. When it happens, the plants direct most of their energy toward producing more leaves and flowers, instead of ripening the tomatoes.

The number one cause of tomatoes not turning red when the time is right is temperature. Regular tomatoes will not turn red if the temperatures for their ripening are off. Temperatures above 85 degrees Fahrenheit are too high, and anything below 50 degrees Fahrenheit is too low. The bigger risk of the two, however, is the high temperatures that can often occur during a heatwave.

Outside the temperature range of 50-85 degrees Fahrenheit, the tomato plant is unable to produce enough carotene and lycopene that cause the color change for the ripening process. The best temperature for tomato ripening is 70-85 degrees Fahrenheit.

Although tomatoes love heat, too much of it can be bad. Extended periods of heat stress can cause plants to stop developing and this may prevent the tomatoes not to turn red. Too much cold temperatures stop the production of the carotene that is needed for the ripening of the tomato. This usually happens at the end of the growing season.

Excessive watering and feeding of the plants can also be bad. If tomato plants are provided with more nutrients than they need, it can cause them to direct their energy towards producing new growth instead of ripening the fruit.

When Do Tomatoes Turn Red?

Tomatoes have a long growing season. To be a tomato gardener, you must have a lot of patience. Tomatoes will turn red when ripe, provided all their growing and ripening conditions are being met. If you are unsure when exactly this time should be for the particular variety of tomatoes in your garden, check the packaging that the seeds or seedlings came in. The growth period of the tomatoes should be given there. If you do not have access to the packaging, a quick Google search might be helpful to estimate the approximate time you should expect your tomatoes to ripen.

Generally, most tomatoes take between 60 to just over 100 days to ripen. This is between the day they are transplanted into the soil and the day they are ready to harvest.  The speed with which they ripen will depend on variety, environmental conditions, and the size of the tomato fruit. For example, cherry tomatoes ripen faster than larger tomatoes.

To get them to ripen at the right time, you have to plant them in the soil at the right time. The best time to do so is to start the seeds about 6-8 weeks before the last frost date.

Keep in mind that not all tomatoes will turn red. Some tomatoes are yellow, orange, purple, or even green when ripe. Know what the variety of the tomatoes you are planting is, so that you know what they should look like when they are ripe.

What to Do When Your Tomatoes Are Not Ripening

Both larger and small tomatoes such as cherry tomatoes not turning red can be due to various reasons, as we have already discussed. Here are 14 tips for ripening tomatoes when they won’t ripen.

1. Stop the plant from growing

One of the major reasons this happens is the result of overgrown plants. This then causes the plant to divert more energy into producing new plant growth, instead of toward the fruit and seed. One way to deal with this is to stop the plant from inefficiently utilizing energy. Do this by pinching or cutting off the top point of the plant that is growing, so that the plant will not get any bigger.

Also, cut off any new flowers that have not produced any fruit yet. They will never be able to do so as there is not enough time left in the growing season.

2. Cut off the outside shoots

Tomatoes are very strong growing plants and produce a lot of foliage. Even if you keep trimming them, shoots keep reappearing. You should always pinch off or cut off any side shots that develop after the plant has matured. Always keep an eye out for them and remove them as soon as they appear. This will save the plant from using energy for growth, which it should rather direct towards fruit ripening.

3. Trim back plant foliage

Like all other plants, tomatoes need light for good growth and health. If there is too much foliage that covers the plant and minimizes the amount of light that it gets, the plant will not grow very strong. Trim off as much of the foliage as you can without damaging the plant. This will enable the plant to get direct sunlight that will warm it up, helping to speed up ripening.

tomatoes not ripening

4. Provide heat 

If you can provide your plants with some form of heat, it will help ripen them. If you can install grow lights that can increase the temperatures even slightly, the ripening process would speed up.

Check Price on Amazon

5. Move plants to an indoor area

Tomato plants are great for growing indoors. If your tomatoes were planted in a movable grow bed or pot, moving them indoors where you can control the temperature to make them more suitable for ripening will greatly benefit the plant.

Check Price on Amazon

6. Cut back on fertilizing

Excessive fertilizing of tomato plants can do more harm than good. Ideally, tomatoes should only be fertilized about 2-3 times during their entire growth cycle. Do not fertilize the plants when they are close to harvest, and this will cause them to direct energy towards growth and not ripening.

7. Reduce watering

Excessive watering can also delay tomato fruit ripening. Reduce the rate of plant watering by only watering when you notice signs of wilting on the plant. This can help to push the plant towards fruit ripening.

8. Wait for cooler temperatures

If your tomatoes are not turning red because of high temperatures, you may just have to wait until the weather cools and ripening resumes.

9. Hang the plant upside down

Uproot whole plants when tomatoes won’t ripen. Hang the plant upside down in a warm and dry room where it will be protected from extreme temperatures and frost. The fruit can ripen as the plant dies. When trying out this method, try to get some of the soil out with the root.

10. Put the tomatoes in a bag with a banana

If you still can’t get your tomatoes to ripen, try this trick of putting them in a bag with a ripe banana. The ripe banana releases ethylene which is a great promoter of tomato fruit ripening. If you choose to try this method, check your tomatoes regularly for any sign of rot. If you notice that any are starting to rot, remove them before they damage the others in the bag.

11. Put the tomatoes in a bag with a ripe apple

This method is the same way as the previous method described, just with a different fruit.

12. Pick individual tomatoes to ripen

You can also pick tomatoes individually to ripen them by placing them on window sills, and they will eventually turn red.

13. Plant the next crop of tomatoes on time

As more of a proactive way to ensure that your tomatoes ripen, plant them at the right time so that they have enough time in the growing season to grow and ripen before the temperature gets bad.

14. Pick the green tomatoes

If all efforts of ripening your tomatoes fail, you can pick them green. Green tomatoes are great for pickling.

Can Tomatoes Ripen Off the Plant?

Normally and ideally, plants should be left on the plant until they ripen, and then they can be picked off, However, some conditions occur that may require you to pick them off the vine and attempt to ripen them indoors. These factors are usually associated with environmental conditions such as temperature and frost.

You can pick unripe tomatoes and ripen them off the plant, provided that you can give them good ripening conditions as described above.

Why Are My Tomatoes Not Ripening? – Summary

Tomatoes are very easy plants to grow, as long as you know the variety and their ideal growing conditions. Key points to remember are that tomatoes won’t turn red if it’s too hot (above 85°F) or too cold (below 50°F), If your tomatoes do not grow well, they may be stressed and this may affect ripening.   Smaller tomatoes are the result of stressed tomato plants.

Tomatoes produce carotene and lycopene which will promote ripening at the end of the growing season. Make sure that your plants are provided with good growing conditions so that they can produce enough carotene and lycopene.

Tomatoes are slow to ripen on the vine because they are overfed, overwatered, overgrown, or the weather is too cold. Adjust your maintenance schedules to get the best out of your plants.

We hope this article provided you with enough information, tips, and tricks that you will use to ripen your tomatoes that may not be turning red on their own.

Happy growing!

Filed Under: Interesting Facts, Organic Food, Plants, Tips & Guides Tagged With: cherry tomatoes not turning red, tomatoes not ripening, tomatoes not turning red, tomatoes wont ripen, when do tomatoes turn red, why are my tomatoes not turning red

How Many Potatoes Will Grow Per Plant (and From ONE Seed)

May 16, 2023 by Dr. Nyiko C. Mabasa

The potato is one of the most commonly grown, consumed, and versatile vegetables in the world. Its ease of growth contributes to its popularity. Knowing how many potatoes will grow per plant is crucial to know how your plants will perform, and to deciding how many you should plant to fulfill your needs.

How many potatoes will grow per plant will depend on certain factors such as the type or variety of potatoes being grown, environmental conditions, and how well their growing needs are being met.

To know how many potato plants to plant to ensure that you harvest enough to last you and your family until the next growing season, keep reading.

How Many Potatoes Grow From One Plant?

How many potatoes per plant can you expect from your harvest? The average number of potatoes a potato plant can produce per plant, under ideal growing conditions, is between three and eight. Different varieties may produce fewer or more potatoes than others. The sizes of the tubers may also differ in sizes, ranging from small to extra large.

If you are looking to provide for a family, about 40 potato plants may be sufficient to provide for the year. If these plants all grow healthily until harvest, you should expect a harvest of around 125 pounds of potatoes.

How Many Potatoes Grow From One Potato Seed?

Seed potatoes vary greatly in size. A small-sized seed potato is planted whole and can produce a single potato per plant. Larger seed potatoes, however, can be cut into halves or quarters, planted, and can produce between two and four potato plants.

Planting seed potato whole will usually produce stronger plants. It is, therefore unnecessary to cut the seed potato, unless it is very large.

A single-seed potato that grows well will produce one plant, and this one plant will produce between 8 and 10 full-sized potatoes. In addition to this, each potato plant is likely to have a couple of smaller baby potatoes as well.

Do Different Potato Varieties Produce the Same Number of Potatoes Per Seed?

How many potatoes per plant seed can differ between different cultivars? If you want to know how many potatoes your particular variety will produce, you will need to read the plant descriptions in the packaging or on the resources available online.

Keep in mind, however, that the average yield per potato plant listed assumes that ideal growing conditions for that particular potato variety are met. If the conditions are not ideal, the plant may produce fewer potatoes or nothing at all.

Ideal Growing Conditions for Optimal Potato Yield

While different potato cultivars will have different specific environmental conditions for maximum yield, here are some things you can do to help ensure that you get optimal productivity out of your potatoes:

1. Planting distance

Potatoes are tubers that grow underground. Because of this, they need plenty of space to grow. This makes it important to provide them with sufficient room to do so.

If potatoes are planted too closely, young tubers will not grow as well as you would expect them to. This will result in a poor yield.

Another reason for not planting them too closely is that they will compete for nutrients, further impacting their growth negatively.

Potato plants should be planted 12 -14 inches apart, and have 3 feet between rows to achieve the best growth and for you to obtain optimum yield. If you plan to harvest your potatoes at the baby stage, however, you can plant them closer to each other, as they will require less space to grow.

If you have adhered to this recommended planting distance, you should not have to worry about the possibility of them crowding up in the soil. They will adjust themselves and spread out as needed, provided the soil they are planted in is right. The plant roots and tubers will grow well.

2. Planting depth

How deep you plant your seed potatoes will have a massive impact on the eventual yield. Seed potatoes need to have enough soil covering them so that no part of the tuber is left exposed. If they do not get completely covered and are exposed to the sun, they will turn green due to the solanine in them. If these potatoes are consumed, they will cause solanine poisoning. Green potatoes should not be eaten and must be immediately discarded. This will lead to a loss of crop yield.

The best depth to plant your potatoes is 4-6 inches. Start with this depth and hill them up as the plants continue to grow taller to keep them protected.

You can hill your potatoes up by mounding the soil around them with a spade, hoe, or other implement that you have. Hill them up to within 2-3 inches of the plant foliage. Start hilling them when the plants have attained a height of 8-10 inches, and repeat the process when they get new growth of 8-10 inches.

The process of hilling your plants will help to provide them with sufficient soil for adequate growth and expansion of tubers underground. The higher level of soil will also help to support the growing foliage on top of the ground. If your plants are not provided with enough soil, they will be exposed to the sun, which will diminish your crop yield.

3. Soil type

For potato tubers to grow well and expand underground, they need to be planted in loose soil. Using loose, soft, and well-draining soil will help to increase your potato yield. Potatoes require plenty of space to spread their roots and grow large potatoes.

Growing potatoes in compacted soil will produce only small potatoes as they will struggle to push against the dirt to increase in size.

4. Soil fertility

Soil fertility is an important aspect of increasing your potato yield. Apply fertilizer suitable for potatoes to the soil before your potatoes are planted. It is important to use a fertilizer that is specific for potatoes when you first plant them, and mid-way through the season so that they get the boost of nutrients they need to produce as many potatoes as they can.

Use a 5-10-10 fertilizer in the planting rows and carefully work it into the soil. Be careful to follow the instructions on the packaging container. You will also have to side-dress the potatoes with the same fertilizer before the first hilling.

5. Soil moisture

Potatoes need adequate, but not too much watering. Potatoes need about 1 to 2 inches of rain per week. If your area does not receive this amount of rain, you will need t give your potatoes supplemental water.

Water your potatoes enough to saturate the soil up to the level of the roots and tubers. Water each time the first two inches of the soil feel dry.

Going for long periods without watering or adequate water will lead to malformations of your potato tubers, which can lead to poor yields. This is because insufficient moisture will cause the potato tubers to grow slowly if they even grow at all.

If you resumed watering your potatoes or got plenty of rain after a period of no rain, it will cause the tubers to grow rapidly and split or develop malformations.

To get the best yield out of your potatoes, and get the best shapes, you will need to water them regularly during their growing season.

potatoes per plant

6. Pests

Pests can have a detrimental impact on your potato crop yield. Treat them as soon as you notice them before they have any significant damage to the plants. Insect pests such as the Colorado potato beetle can completely destroy the foliage of the plants. If this happens, the growth of tubers underground will stop because the plants will not have enough support. Eventually, you will have reduced yield and small potatoes.

7. Sunlight exposure

Like all other plants, potato plants require sunlight to carry out photosynthesis. Without sufficient sunlight, the growth of the plant will slow down and result in your potato yield is poor.

Make sure you plant your potatoes in an area that receives at least 6 to 8 hours of direct sunlight each day, for the entire duration of the growing cycle. The plants can and will grow with less light, however, their growth will not be as good as it would be if they received more light. So to get the best growth, health, and ultimately good yield from your potatoes, provide them with plenty of sunlight.

8. Proper hilling

Hilling your potatoes at the time they are first planted, and one or two more times during their growing season will help improve crop yield. Hilling provides support for the growing plant foliage, which will force it to grow upwards toward the sunlight and consequently increase the growth of tubers.

9. Choosing the right potato variety

There are hundreds of potato varieties to choose from that are readily available from local seed stores and online shops. Before you choose the variety to grow. Do a bit of research around it to find out if it is suited to your climate, or if you will be able to provide it with the growing conditions it requires.

It is also helpful to know information such as the length of the growing season, the amount of space they need for growth, specific uses of that particular potato, and as well as resistance or susceptibility to disease and parasites.

Potato varieties such as Pontiac Red, Kennebec White, and Purple Majesty are all great varieties of potatoes that consistently produce high yields of potatoes. If you are you do not know much about potato varieties, you can begin by researching these three to see which one would be best suited to your environment.

10. Plant your potatoes at the right time

Potato plants have an ideal time that they should be planted to get the best chance of survival. You should plant them when the soil warms up to about 45 degrees Fahrenheit. In most areas, that would be about two weeks after the last frost date.

While looking at the timing, it is also key to monitor the soil moisture content. If you have had a wet spring, wait a few weeks until the ground has dried up a bit. If the soil is too wet, it can cause the potato tubers to rot.

If you have no choice but to plant potatoes earlier than this, look for the varieties that mature earlier, as they are better able to withstand cold conditions. You can plant these up to six weeks before the last first date.

How Many Potatoes Does a Potato Plant Produce?

Typically, a single potato plant will produce anywhere between 3 and 5 pounds of potatoes. This may be enough to feed a family of four people twice.

Keep in mind, however, that different varieties of potatoes will produce different numbers of potatoes. In addition to this, the growing conditions such as sunlight, nutrient provision, adequate growing space, and a good irrigation schedule have to be maintained well to achieve optimum growth.

Can I Use Store-Bought Potatoes as Seeds?

Technically, yes. Store-bought potatoes can be used as seeds to grow potatoes. You will have figured this out at some point when you left potatoes out for too long and they started sprouting. If you plant them in the ground during the right growing season, you should harvest some potatoes.

However, potato growth experts advise against using shop potatoes as seeds. They recommend only using certified potatoes to plant in your garden.

The reasons for this include that potato growers put sprout inhibitors to slow down the rate of budding when the potatoes are being shipped, and while they are at the store. This may cause the potatoes to grow weak or not produce any growth when planted.

Another reason that you should not use shop potatoes as seeds is that they often contain a lot of microorganisms and diseases. These can easily spread to plants and completely destroy all other plants in your garden. Seed potatoes that are certified will come with a guarantee that they are free of any diseases or microorganisms that can destroy the potato and other crops.

Certified seed potatoes are usually strong and healthy, and have a higher chance of having vigorous growth, producing large and strong potatoes, and ultimately a good yield.

How Do I Know That My Potatoes Are Growing

Because potatoes grow underground, it may be difficult, especially for new and inexperienced growers to be able to tell what stage their plants are at. It can be difficult to tell whether or not your potato tubers are growing. There are signs that you can look out for.

Flowering is a great indicator that your potatoes have started growing. If you want to harvest your potatoes in the baby stage, you can go ahead and do so at this point. After the flowers have come and gone, the foliage at the top of the soil will die back. This is so that the plant will start directing its energy towards growing the tubers larger. If you want to harvest full-sized potatoes, you should do so after the plants have died back.

Another way to know that your potatoes have matured is when the stems of the plants have started to go yellow and die off. This usually happens at the end of summer, or early in the fall.

If you still want a bit of reassurance that your potatoes are ready to harvest, you can dig a small test spot and get a few tubers out to gauge if they are at your desired harvest size.

Quick Summary – How Many Potatoes Will Grow Per Plant (and From ONE Seed)

Different varieties of potatoes will produce different amounts of potatoes at harvest time. To get an idea of how many your particular variety will produce, you will need to read the information on the seed packaging. Generally, with potatoes, however, if the plant is healthy, you can expect to dig up about five or six full-size potatoes per plant.

Potato plants yield from five to 10 potatoes per plant depending on the variety, climate, and whether the growing conditions of the plants are met. Usually, a single potato plant produces anywhere between 3 and 5 pounds of potatoes. Knowing this can help you to plan how many plants to plant to you can have enough potatoes until the next growing season.

Follow the guidelines and tips provided in this article to increase your potato plant harvest. Remember that a single plant has the potential to produce between three and four pounds of potatoes, and a single seed potato will produce above four or five plants. Start from there and then plan how many potato plants to plant for an adequate supply.

We hope this article has given you all the information you need to know on how many potatoes per plant you can expect from your potato plant. Happy growing!

Filed Under: Organic Food, Plants, Soils & Plant Nutrients, Tips & Guides Tagged With: how many potatoes does a potato plant produce, how many potatoes grow from one plant, how many potatoes per plant, yield per potato plant

  • Go to page 1
  • Go to page 2
  • Go to page 3
  • Interim pages omitted …
  • Go to page 215
  • Go to Next Page »

Primary Sidebar

  • Best Soil for Aloe Vera
  • Tomato Trellis
  • When to Harvest Broccoli
  • Gypsum for Soil
  • Blood Meal for Plants
  • How to Plant Sprouted Potatoes
  • Web Stories

Footer

Growertoday.com is a participant in the Amazon Services LLC Associates Program, an affiliate advertising program designed to provide a means for sites to earn advertising fees by advertising and linking to amazon.com. Amazon, the Amazon logo, AmazonSupply, and the AmazonSupply logo are trademarks of Amazon.com, Inc. or its affiliates.

  • Advertise With US
  • Privacy Policy
  • About Us

Copyright © 2023 Grower Today